
Eco-Friendly Easter Egg Dyeing: Using Natural Pigments
- felichiccuisine

- Apr 9, 2024
- 8 min read
by Feli Chic'Cuisine

Discover how you can color eggs naturally by using pigments derived from plants and spices. Dyeing eggs with natural pigments is a beautiful and eco-friendly way to showcase your creativity and celebrate this holiday.
Easter egg dyeing is a beloved tradition, and what better way to celebrate the holiday than by creating beautiful, vibrant eggs with eco-friendly and natural pigments? By using ingredients from your kitchen and garden, you can create stunning, chemical-free designs while also being kind to the planet.
In this post, I’ll dive into how you can dye Easter eggs using natural pigments derived from plants and spices, the benefits of choosing this method, and tips for achieving the perfect hues.

Why Choose Natural Pigments?
As much as we love the bright, colorful Easter eggs, commercial dyes are often filled with harsh chemicals and artificial colors. These not only harm the environment but can also come into contact with food.
Experimenting with natural pigments to dye Easter eggs can result in a range of colors and shades, depending on the plant or spice used and the time left in the dye.
Choosing to dye your eggs with natural pigments not only avoids these harmful substances but also lets you embrace sustainability and creativity.
Natural dyes come from sources like vegetables, fruits, flowers, and spices. They're a safer alternative for both your family and the planet. Additionally, many natural pigments have properties that benefit your health - such as antioxidants and vitamins.

What You'll Need for Natural Egg Dyeing
To create a beautiful array of naturally dyed Easter eggs, all you need are some basic ingredients, eggs, and a little patience. Below are some common plant-based and spice-based dyes you can experiment with:
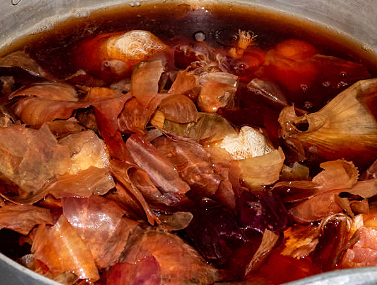
Yellow Onion Skins:
✔ Yellow onion skins create a golden or warm brown hue.
✔ The longer you leave the eggs in the dye, the darker the color.
Red Onion Skins:
✔ These offer a reddish-brown tone that adds depth and warmth to the eggs.
Red Cabbage:
✔ Red cabbage creates beautiful shades of blue, from a soft pastel to a deeper indigo, depending on the pH of the dye solution.

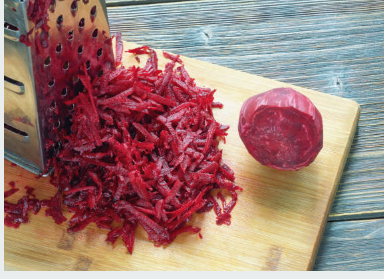
Beets:
✔ Beets are fantastic for creating rich pink or purple hues.
✔ The longer the eggs sit in beet dye, the darker the color gets.
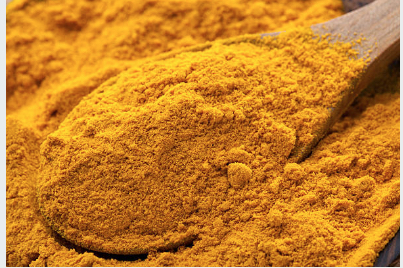
Turmeric:
✔ Known for its vibrant yellow color, turmeric can produce bright and bold golden hues on your eggs.
Other Options:
You can also experiment with other natural pigments like spinach (for green), blueberries (for purple), or even coffee grounds (for brown shades).

Natural Pigments, Beautiful Results
Last time, I decided to mix yellow and red onion skins to dye my eggs, and the results were fantastic! The combination created a warm, rich range of colors, from golden amber tones to deeper, reddish-brown shades.
The mix created subtle variations in each egg, giving them a natural, rustic look that I absolutely loved. It was like creating a beautiful, earthy palette without much effort, and the results were far more unique and personal than any store-bought dye could achieve.
The color of the eggs can vary depending on whether you're using brown or white eggs. White eggs tend to absorb the dye more vividly, while brown eggs usually result in deeper, richer shades.
It’s something to keep in mind when planning your colors, but honestly, it just adds to the fun of experimenting and seeing what kind of results you get.

Enhancing Colors with Vinegar in Natural Dyeing
When dyeing Easter eggs with natural pigments, adding vinegar to your dye bath can make a noticeable difference in the intensity and longevity of the colors. Vinegar acts as a mordant, which helps the natural pigments bond more effectively to the eggshells, creating deeper, more vibrant hues.
To use vinegar, simply add 1 to 2 tablespoons per cup of dye liquid before placing the eggs in the bath. This not only improves the color’s adherence but also ensures that the dye sets, making your beautifully colored eggs last longer.
Be sure to stir the vinegar into the dye while it’s still warm, and then let it cool slightly before soaking your pre-boiled eggs. With this simple step, you'll get richer, more consistent colors that truly pop!

Materials Needed:
To create a beautiful array of naturally dyed Easter eggs, all you need are some basic ingredients and a little patience.
✔ White or brown eggs (white eggs give brighter colors, while brown eggs result in deeper, richer tones)
✔ Natural dye materials (e.g., yellow onion skins, red onion skins, turmeric, cabbage, beets)
✔ Vinegar (1–2 tablespoons per cup of dye liquid)
✔ Water
✔ A large pot for boiling
✔ Strainer or cheesecloth
✔ Bowls or containers for dyeing
✔ Spoons or tongs for handling eggs

How to Dye Eggs with Natural Pigments
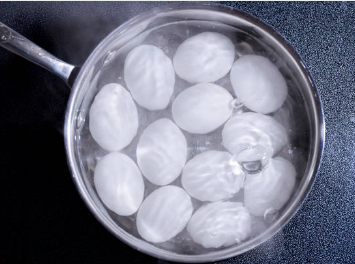
Step 1: Boil the Eggs
✔ Place the eggs in a single layer at the bottom of a large pot. Make sure they’re not crowded.
✔ Cover the eggs with cold water, making sure the water is about an inch above the eggs.
✔ Bring the water to a boil over medium-high heat. Once it reaches a rolling boil, reduce the heat to a simmer.
✔ Simmer for 9-12 minutes, depending on how firm you like the yolk. For fully set yolks, simmer closer to 12 minutes.


Step 2: Prepare Your Dye Bath
✔ Yellow Onion Skins: Boil the skins in water for 30 minutes to extract the color.
✔ Red Onion Skins: Do the same as the yellow onion skins.
✔ You can add a splash of vinegar to help the color adhere.


✔ Red Cabbage: Chop the cabbage and boil it for around 30 minutes. The color will be purple at first, but as the pH level changes, it can shift to blue or green.
✔ Beets: Grate the beets and simmer them in water for 30 minutes to extract the juice.


✔ Turmeric: Mix the powder with water and boil for 10-15 minutes.


Step 3: Dye the Eggs
✔ Once your dye bath is ready, strain it to remove solid pieces, leaving just the colorful liquid behind.
✔ Add vinegar (1–2 tablespoons per cup of dye liquid
✔ Place the boiled eggs into your dye bath and allow them to soak.
✔ The longer you leave them in, the more vibrant the colors will be.
✔ If you want a lighter shade, a short soak of around 10-15 minutes will give you a pastel effect.
✔ For deeper hues, leave the eggs in for up to an hour or longer, checking the color every 15 minutes.

Step 4: Let Them Dry
✔ Once your eggs have achieved the desired color, remove them from the dye bath and let them dry completely.
✔ For an added touch, gently rub the eggs with a bit of vegetable oil to make the colors pop and give them a glossy finish.
In the photo above, the colors were achieved using a mix of natural ingredients on brown eggs, which added depth and richness to the final shades.
✔ The warm, earthy red-brown tones came from a combination of yellow and red onion skins, creating a rich, rustic hue.

✔ The blue-gray, almost slate-like shades were obtained by dyeing eggs with red cabbage, which developed into deeper, moodier tones the longer the eggs soaked.

Each egg took on its own unique variation, influenced by the natural pigments and the eggshell color. The result is a beautifully organic and earthy palette, showcasing the magic of natural dyeing.
Tips for Best Results:
✔ Eggshell color matters – White eggs produce brighter colors, while brown eggs create deeper, more muted shades.
✔ Layering colors – Try soaking an egg in one dye, letting it dry, and then placing it in another color for unique tones.
✔ Longer soaking = richer colors – Leaving eggs in the dye overnight gives the most intense shades.
✔ Use Vinegar: Adding a tablespoon of vinegar to the dye bath can help to enhance the color and increase its vibrancy.
✔ Protect Your Hands: Natural dyes may stain your skin, so it’s a good idea to wear gloves to avoid any unwanted splashes or stains.

Embracing the Imperfections: The Beauty of Naturally Dyed Eggs
One of the best things about dyeing eggs with natural pigments is that no two are ever exactly the same. The colors can turn out a little different each time - some eggs might be a bit lighter in spots, others darker or more uneven - and that's what makes them so special. Those little imperfections are part of the charm.
Natural dyeing invites us to appreciate the unique, handmade qualities of each egg. Unlike the perfect, uniform colors you might get from store-bought dyes, the hues from onion skins, beets, or turmeric have a natural, organic feel to them.
Each egg tells its own story, with its own subtle variations, and that’s what makes them so beautiful. Instead of aiming for perfection, it’s about celebrating the beauty in those little differences, and it’s something I’ve grown to love every year.
Eco-Friendly Easter
Egg Dyeing
Discover how you can color eggs naturally by using pigments derived from plants and spices.
General Ingredients
12 eggs (brown for deeper tones, white for brighter colors)
3 cups water (per dye bath)
3 tablespoons white vinegar (helps set the dye)
Olive oil (optional, for shine)
Natural Dye Sources:
Yellow Onion Skins – 2 cups (Golden-Brown)
Red Onion Skins – 2 cups (Rusty Red to Maroon)
Red Cabbage – ¼ head, chopped (Blue-Gray to Slate Blue)
Beets – 2-3, chopped (Soft Pink to Burgundy)
Turmeric – 2 tablespoons (Bright Yellow to Golden Orange)
Method
Prepare the Dye Bath
1. Place the natural dye source (onion skins, cabbage, beets, or turmeric) into a medium pot. Add 3 cups of water (or enough to fully submerge the eggs).
2. Bring the mixture to a boil over medium-high heat, then reduce the heat and let it simmer for 30-45 minutes. The longer it simmers, the stronger the color will be.
Strain & Add Vinegar
3. Remove the pot from the heat and strain out the solids (onion skins, cabbage, or beets), keeping only the colored liquid.
4. Stir in 3 tablespoons of white vinegar—this helps the color bind to the eggshells.
Let the dye cool slightly before using.
Dye the Eggs
5. Carefully place boiled eggs into the dye bath. For lighter colors, let the eggs soak for at least 30 minutes. For deeper colors, leave the eggs in the dye bath for several hours or overnight in the refrigerator.
6. If needed, gently stir or turn the eggs occasionally to ensure even coloring.
Dry & Add Shine
7. Once the desired color is reached, carefully remove the eggs and place them on a rack or paper towel to dry.
8. If a glossy finish is desired, rub each egg with a small amount of olive oil using a soft cloth or paper towel.
Enjoy your naturally dyed Easter eggs!
The colors might not turn out perfect, and some spots may appear, but that’s part of the charm. These little imperfections make each egg unique, and when arranged creatively, they add a beautiful, natural touch to your Easter table.

“Spring unlocks the flowers to paint the laughing soil.” — Bishop Reginald Heber
*All Photographs on Feli Chic'Cuisine, signed Feli Chic'Cuisine are copyrighted.


Comments