

Artisan Sourdough Bread

Updated: 10 hours ago
Naturally leavened, beautifully rustic.

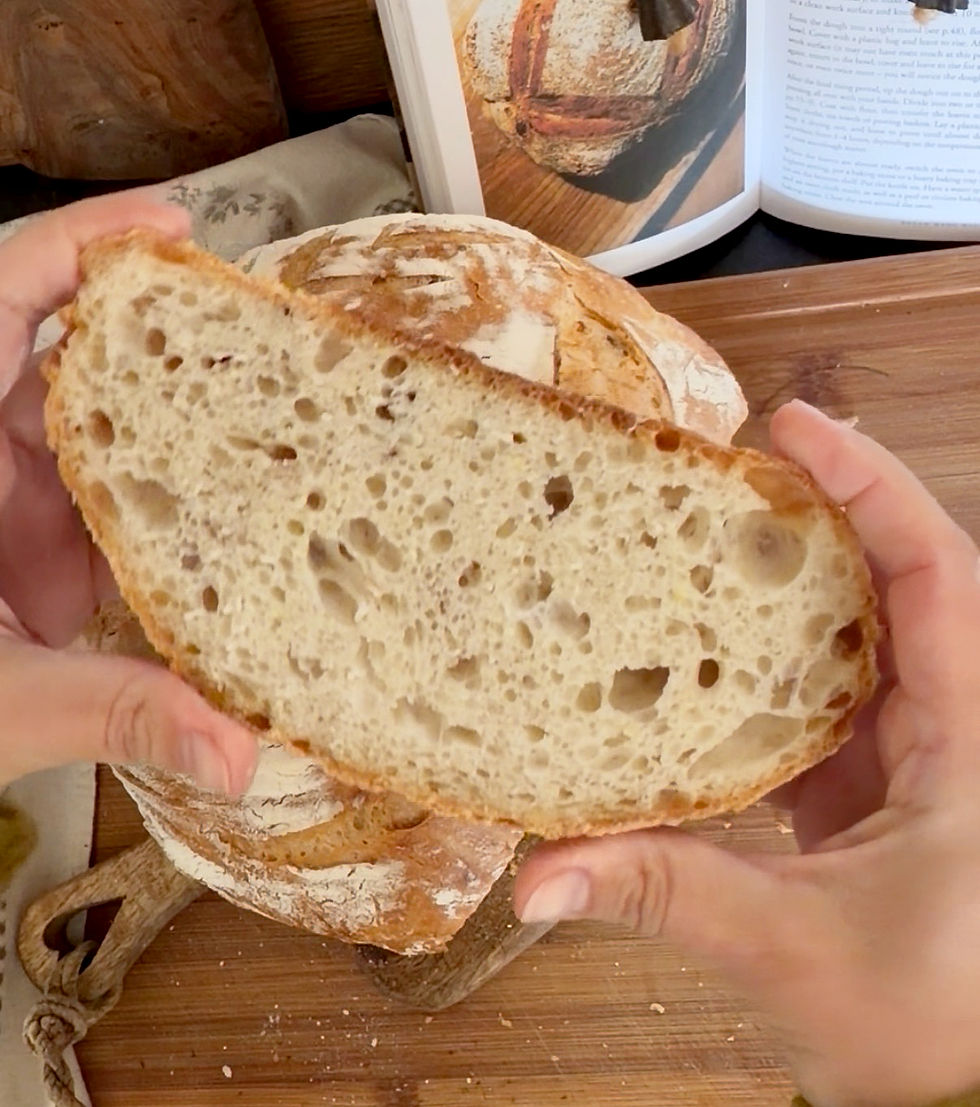
A rustic homemade sourdough loaf with a crisp, golden crust and a light, airy crumb. This is the method I’ve been using and refining over the years, learning to rely more on the dough than the clock.
Sourdough can sound complicated at first, but it really comes down to a few simple ingredients, an active starter, some patience and learning to recognise what your dough is telling you.
Over the years, I’ve tried different flours, hydration levels, timings and techniques. Some loaves turned out beautifully, others definitely taught me what not to do. Little by little, I learned to understand my dough. I look for the signs: how the dough feels, how much it has risen, and those small and larger bubbles appearing on the surface.
The most important part is learning to watch the dough rather than the clock. Fermentation times can vary depending on the temperature of your kitchen and the activity of your starter, so the bubbles, rise and texture of the dough are the best guides.

About the Sourdough Starter
The key to a good Artisan Sourdough Bread is an active, mature sourdough starter. Your starter is what makes the bread rise naturally, without commercial yeast.
A healthy starter should be bubbly, active and able to rise noticeably after feeding. I usually feed my starter twice, without discarding between feeds. Mine is quite active, so after feeding it rises quickly and usually triples in volume.
The exact time this takes depends on the temperature of your kitchen, the flour you use and how active your starter is. Rather than relying only on the clock, look for the signs: the starter should have increased in volume, contain plenty of bubbles and look light and aerated.
If your starter has been sitting in the refrigerator, give it a few regular feeds at room temperature before baking, until it becomes active and rises well after feeding.
→ [How to Make a Sourdough Starter from Scratch]

About This Recipe
This is a rustic, naturally leavened sourdough loaf made with a combination of white flour and stoneground wholemeal flour. The result is a loaf with a crisp, deeply golden crust and a light, airy crumb.
The recipe uses 20% sourdough starter in relation to the total flour, with enough wholemeal flour to add flavour while keeping the loaf light.
You can choose whichever fermentation method suits you:
Overnight method: The dough is bulk fermented, then refrigerated overnight before shaping the following morning. This is the method I use when I want to prepare the dough one day and bake the bread the next.
Same-day method: The dough stays at room temperature after the folds and continues its bulk fermentation for several hours. Once it has developed enough bubbles and feels light and airy, it is shaped, proofed and baked later the same day.

The key is to watch the dough. The times given in this recipe are a guide rather than a rule. Sourdough doesn't always follow the clock.
A warmer kitchen will usually make the dough ferment faster, while a cooler kitchen can slow it down. The activity of your starter also makes a difference.
Instead of relying only on the time, look for the changes in the dough. It should become lighter and more elastic, increase in volume and develop visible bubbles. These are the signs that tell me when my dough is ready for the next stage.
A few things worth knowing before you start:
Use an active starter. It should be lively, bubbly and able to rise well after feeding.
Don't worry if your dough feels sticky at first. It should become noticeably smoother and stronger as you work through the folds.
Temperature matters. Fermentation can be much faster in a warm kitchen and considerably slower when the room is cool.
Watch the bubbles. Small and larger bubbles on the surface are one of the signs I use to judge fermentation.
Don't rush the bulk fermentation. If the dough hasn't developed enough volume and bubbles, it probably needs more time.
Don't rely on the clock alone. Two loaves made with the same recipe can need different amounts of time.
Keep the dough covered. This prevents the surface from drying out during fermentation and proofing.
Let the baked loaf cool. It is tempting to slice it while warm, but giving it at least two hours allows the crumb to finish setting.

Step-by-Step Instructions
Method 1: Overnight Sourdough
1. Mix the dough: 5–10 minutes
✔ Add the plain flour, wholemeal flour, active sourdough starter and most of the water to a large bowl. Mix until there are no dry patches.
✔ Gently work the dough for 5 minutes, stretching, folding and lifting it to help develop strength and incorporate air from the beginning. Don't worry if it feels quite sticky at this stage. This gentle handling helps begin developing the dough's strength and structure.
✔ Cover and leave to rest for 30 minutes.
2. Add the salt: 5 minutes + 30 minutes rest
✔ Add the salt and the remaining water, if using.
✔ Gently squeeze, stretch and fold the dough until the salt is fully incorporated.
✔ Cover and leave to rest for 30 minutes.
3. Stretch and fold about: 1½–2 hours
✔ Perform a stretch-and-fold every 30 minutes, for 3–4 rounds.
✔ With each round, the dough should become smoother, stronger and more elastic. By the final fold, it should feel lighter and hold its shape better.
4. Bulk fermentation: several hours
✔ After the final fold, leave the dough at room temperature for approximately 4–6 hours, depending on the temperature of your kitchen and how active your starter is.
✔ Let the dough ferment until it has visibly increased in volume, feels light and airy, and shows large or small bubbles on the surface and around the sides of the bowl.
The time is only a guide. In a cooler kitchen, fermentation may take longer, while in a warmer kitchen, the dough may be ready sooner. Look for these signs rather than relying on the clock alone.

5. Refrigerate overnight: 8–12 hours
✔ When the dough looks ready, cover the bowl with a slightly damp kitchen towel or cling film and place it in the refrigerator for 8–12 hours. I don't shape the dough before refrigerating it.
✔ The next morning, take the dough out of the refrigerator and let it sit at room temperature for 25–30 minutes.
✔ The dough will still feel slightly cool and firm, which makes it easier to shape. By this stage, the gluten network has already developed through the mixing and folding, giving the dough enough strength and elasticity to hold its shape. The overnight fermentation allows the dough to continue developing flavour and structure.

6. Shape the dough: 25–30 minutes after removing from the fridge
✔ Turn it out onto a lightly floured surface and gently shape it into a round loaf, creating some surface tension without pressing out all the air.
7. Final rise: about 1–2 hours, depending on temperature
✔ Place the dough seam-side up in a well-floured banneton.
✔ Cover the banneton and leave the dough at room temperature.

✔ Allow it to rise until you see small bubbles appearing on the surface and the dough looks lighter and more aerated.

8. Preheat the oven and Bake: 45–60 minutes
✔ Place a Dutch oven or heavy cast-iron pot with its lid in the oven. Preheat to 240°C conventional / 220°C fan.
✔ Place baking paper over the banneton and carefully turn the dough onto it. Transfer it directly into the hot pot.
✔ Score the top with a sharp blade.

✔ Place 2 ice cubes under the baking paper, beside the dough, for extra steam. Put the lid on immediately.
✔ Bake for 30-35 minutes covered.

9. Remove the lid, reduce the temperature to 220°C conventional / 200°C fan, and bake for another 10 minutes, until deeply golden and crisp.

10. Cool: at least 1 hour
Transfer the loaf to a wire rack and allow it to cool for at least 1 hours before slicing.
This gives the crumb time to finish setting.
Same-Day Method
If you prefer to make and bake your bread on the same day, the process is almost the same as the overnight method.
The total active/process time will usually be roughly 9–12 hours from starting the dough to baking. I usually start early in the morning, giving the dough enough time to ferment at room temperature and be ready to bake later in the day.
Follow the first three steps above for mixing, resting, adding the salt and completing the stretch-and-folds. The difference begins after the final fold: instead of placing the dough in the refrigerator, leave it at room temperature and continue with the bulk fermentation.
Love this recipe? Please leave a comment. Your feedback, suggestions, and adaptations are very helpful to other bakers!

Artisan Sourdough Bread
A homemade sourdough loaf with a crisp, golden crust and a light, airy crumb. This is the method I’ve been using and refining over the years, learning to rely more on the dough than the clock.
Yield: 1 loaf | Prep Time: 30 min | Stretch & Fold Time: 1 h 30 min–2 h |
Bulk Fermentation: 4–6 h |
Overnight Refrigeration: 8–12 h
Final Rise: 1–2 h | Bake Time: 40–45 min |
Fermentation times are approximate and will vary with the temperature of your kitchen and the activity of your starter.
Ingredients
625 g plain white flour
125 g stoneground wholemeal flour
150 g active sourdough starter
490–500 g water
15 g salt
Method
1. Mix the dough
In a large bowl, combine the white flour, wholemeal flour, water and active sourdough starter. Mix until no dry flour remains.
Gently work the dough for about 5 minutes, stretching, folding and lifting it with your hands. The dough will be quite sticky at this stage, but this is normal. As you continue with the resting and folding, it will gradually become smoother, stronger and easier to handle.
Cover and rest for 30 minutes.
2. Add the salt
Add the salt and, if needed, a little of the remaining water to help incorporate it. Gently squeeze, stretch and fold the dough until the salt is evenly distributed.
Cover and rest for another 30 minutes.
3. Stretch and fold
Over the next 1½–2 hours, perform 3–4 sets of stretch-and-folds, leaving approximately 30 minutes between each set.
With slightly damp hands, lift one side of the dough, stretch it gently and fold it over the centre. Turn the bowl and repeat on all sides. With each set, the dough should become smoother, more elastic and stronger.
4. Bulk fermentation
After the final fold, leave the dough covered at room temperature for approximately 4–6 hours. The exact timing depends on your kitchen temperature and how active your starter is.
Look for a noticeable rise, a light and airy texture, bubbles of different sizes on the surface and around the sides, and a gentle jiggle when you move the bowl.
The time is only a guide. Let the dough tell you when it is ready rather than relying on the clock alone.
5. Refrigerate overnight
Once bulk fermentation is complete, cover the bowl well with cling film or a suitable lid and place the unshaped dough in the refrigerator for 8–12 hours, ideally overnight.
The cold temperature slows fermentation while allowing the dough to continue developing flavour and structure.
6. Shape the dough
The next morning, remove the dough from the refrigerator and let it sit at room temperature for 25–30 minutes.
Turn it out onto a lightly floured surface and gently shape it into a round loaf, creating surface tension without pressing out all the air. The dough will still feel slightly cool and firm, which can make it easier to shape.
Place the dough seam-side up in a well-floured banneton. Cover and leave at room temperature for approximately 1–2 hours, or until it looks lighter and more aerated, with small bubbles beginning to appear on the surface.
The timing will depend on the temperature of your kitchen, so watch the dough rather than following a strict schedule.
7. Preheat the oven
While the dough is finishing its final rise, preheat a Dutch oven or heavy cast-iron pot with its lid to 240°C conventional / 220°C fan for 45–60 minutes.
8. Score and bake
Place baking paper over the banneton and carefully turn the dough onto it. Score the top with a sharp blade.
Transfer the dough, on the baking paper, into the hot pot. Place 2 small ice cubes under the baking paper, beside the dough, to create extra steam. Cover with the lid.
Bake for 20 minutes covered. Remove the lid, reduce the temperature to 220°C conventional / 200°C fan, and bake for another 20–25 minutes, until the crust is deeply golden and crisp.
9. Cool before slicing
Transfer the loaf to a wire rack and allow it to cool for at least 2 hours before slicing. This gives the crumb time to set and helps the bread develop its final texture.
Happy Baking!
Recipe Notes |
1. Use an active starter. Make sure your sourdough starter is bubbly, well risen and at its peak of activity before mixing the dough.
2. Watch the dough, not the clock. Fermentation times vary depending on your kitchen temperature and the strength of your starter. Look for a noticeable rise, an airy texture and bubbles on the surface.
3. Don't worry if the dough is sticky. This is normal at the beginning. The resting periods and stretch-and-folds will gradually help it become smoother and stronger.
4. Let the bread cool completely. Allow at least 1 hour on a wire rack before slicing, so the crumb has time to set properly.

Have you tried making this Sourdough Bread ? I'd love to hear about your experience! Share your thoughts and any creative twists you added to the recipe in the comments below. Or, tag me on Instagram (@FeliChic'Cuisine) when you post your recipe creations. Let's inspire each other. Thank You!
*All Photographs on Feli Chic'Cuisine, signed Feli Chic'Cuisine are copyrighted.




Comments